Showing posts with label Tippity Tuesday Tip. Show all posts

Tuesday, March 1, 2011

Where You Should Be

Hello and welcome to the {ippity} blog this fine Tuesday morning on the first day of March!  We are taking a break from our regularly scheduled Tuesday {ippity} Blossom post, just for this week, so no worries.  This gave me some time to think about what to share with you today and as I was going through my card stash I found this one I made back in the summer during my Dirty Dozen stint on Splitcoast.
I thought it tied in with the fabric theme post I did last week, then I decided to focus on just this set! It's one of my faves and I know the quote it one of Angela's FAVES!!! It is just great words to live by. So today, we're taking a look back at Where You Should Be! 

If you don't own this set yet, find an {ippity} Chick and order it! Just click this button to see who's selling in your area!


Locate an Ippity Chick!


Here are some projects from the SCS Gallery I just LOVE!

by Jen (Jenstampin4U)

by Ashley (HeartHugsDesigns )
by Terri ( Trotskired7)

by Jessica ( pinkgirl76)
and this by Betty ( gbedwright)


Hope you enjoyed taking another looksie at this fabulous {ippity} set.  It's my fave and I'm sure it's a favorite for many of you, too!  Have a great day!
Hugs,


Lisa Henke


Monday, August 30, 2010

T{ippity} Tuesday Tip.

Happy Tuesday!!


Hi, it's me Angie for a T{ippity} Tuesday Tip.
Hope you are all enjoying this wonderful day.
I am sure most of you love techniques.. but most times I never remember how to do it the next time . Well let's say you are having a Ippity Party , Craft sale or even as a little added thank you in your mail out. I was thinking of these fun Technique Tags.

You have your decorated tag using your Ippity products, and on the back of the tag you have the technique, with all the ingredients and Instructions to make the fabulous tag you are featuring.

I made this one up, Using alot of those wonderful Ippity Inks and some of the stamps from

You Deserve and Bitty Pixie Paisley.

Many Thanks.


Now on the back of the tag I have the technique with all the ingredients to make this tag.


I was thinking this would be great as a giveaway for your clients. Cause we all love learning new things to do with the stamps and you can showcase these at your craft sale or if you are having home parties it might be a great way to have examples of what you will be doing that night and then they get to take these home to remember what they have learned.


Now here is how I got the info on the back of the tag.
I used my word and on the computer wrote all my instructions out. Using the center and about a number 8 size of font. Now print it out on a blank piece of paper.
Making sure it all fits nicely on your tag area.


Place the tag on top of the instructions that you have just printed off. Adhering it with some tape.. easily removable tape.

you should make sure it is centered where you want the words to go.


Now put it back in the printer, remembering to place it upside down , with the tag end to the back of the printer. It will print on the tag in the same spot it printed on your paper. Then just remove. Now you will have your instructions on the back and your technique on the front.


I hope this is a fresh and new idea for adding something a little different. I am sure your clients will love getting these, and the more product used might increase sales.


Hope you give this a try.


Angie Blom


Tuesday, August 24, 2010

T{ippity} Tuesday!

It's time for another T{ippity} Tuesday post and I'm happy to say I thought of something great to share with you all today. It's one of those tricks that I use all the time and I remembered how brilliant I thought it was when I first heard it. It's something I learned from Lauren Meader years ago. If you ever get lost trying to find the perfect placement for a sentiment, try this.
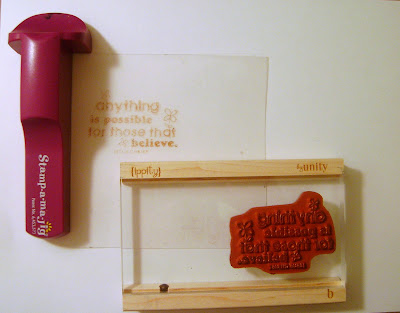
Have a piece of scrap acetate on hand (your stamp-a-majig clear sheet also works great for this). I keep mine in the side drawer of my desk, so I can pull it out quickly when I need it. I stamp the sentiment I want to use on the acetate and because it is clear I can see through it and move it around my card front to find the perfect place for my sentiment. Sometimes I find the sentiment I want to use just isn't the right size, so I need to find something else that will work. The acetate makes this process easy, without messing up your finished card. After you see where you like the sentiment, ink your stamp again and stamp it on your card.
Hope you are having a great week! We are working on changing up this Tuesday blog post. Stay tuned for some new and exciting stuff!
Many Hugs!
Lisa Henke
Locate an Ippity Chick!

Tuesday, August 10, 2010

sneak peek day #3...

...and the countdown CONTINUES...
as we are "creepin" up on  
our BIG BIG RELEASE PARTY!!!

{had to add in the "creepin" in honor of one of our newest kits..."that's creepy"...see sneak peek below...}  heehee ;)

WOW...have you been hopping with us the past couple of days???
what FUN inspiration and SNEAK PEEKS..
I can't WAIT until you see the FULL KITS on THURSDAY!!!

HIP H{ippity} HOORAY!!!

here's what we got for you today....
along with some sneaks of the upcoming PAPER PACK and NEW INK!!


SO...
I am SUPER EXCITED to hear what you think...
do you like what you're seeing?????
aren't these images ADORABLE!!!
plus...don't forget:

2. we have THREE...
yep, THREE super FUN challenges in honor of our NEW RELEASE party on Thursday

3. leave a comment on all the blogs for your chance to WIN A NEW RELEASE!
{all winners will be announced on thursday}

4. TELL ALL your FRIENDS about our NEW RELEASE party on Thursday!!

LET's get this BLOG HOP started, huh?!?!
click on the icon below...

Next Blog
get YOUR ippity TODAY!!!


Locate an Ippity Chick!
Eryn Hagen

Tuesday, July 27, 2010

Better Late Than Never

Hiya! I'm finally here, remembering that today is my day to post a Tip for you all! I've meant to put this together 5 days ago and well, you know how the days just slip away and all of a sudden you remember you had something to do? Yep, that's what just happened to me! LOL!

With the new release coming upon us, I thought it would be a great time to offer a few business tips from one of our fellow {ippity} chicks. It's always nice to have a refresher on some tricks of the trade, plus there are plenty of new chicks that are eager to learn how others are making it work!

A while back I started a thread on the {ippity} Chick subforum on SCS asking for Tips to post on our Tippity Tuesday post here. We are always looking for ideas, so if you have any and want to share feel free to email me. A few weeks back I received the sweetest email from Jenny Johns (jenstampin4u). She complied a great list of what she's been doing to get her business thriving. The one thing I noticed, (and I've heard and seen plenty of other Chicks say it too) is she does a lot of little things that make a difference. The small things matter! Here's a few tips from Jenny, in her own words:
I recently started implementing these tips and they are showing some success. I need to continue to work on getting my {ippity} name out there locally, and I am so glad that these things are helping me go in the right direction!

Local deliveries:
I like to advertise that I will 'deliver free of charge' any local {ippity} orders with 30 miles of my home. Now I have been asked to deliver a little over 30 miles, and I've still included it in the 'free zone' (case by case basis, or course). I even have customers who meet me half way, usually at a Starbucks (my fav place), or a book store. I figure it's worth it to get a new customer and to be able to show them the sets and chat about the versatility of them in person.

Orders:
As soon as I get a phone call or email order, I respond within 1 day to confirm the order (it's usually within the same day). Once I confirm their order, I still ask if there is anything else they would like to purchase (it's okay to ask for more business, the worst they can do is say no). I then issue a Paypal email for payment. Once payment is made, I again contact the customer to confirm delivery day and time and I get this completed immediately.

Inspiration:
I like to give a 'thank you' card for inspiration to my customer for their order. I keep thank you cards that I made from a variety of {ippity} stamp sets...I choose a card using a stamp set other than one that my customer ordered. The customer may like the stamp set that I used and it could be a possible future purchase.

Add-ons:
I carry one of each stamp set (that I have in stock) in my {ippity} shopping bags (that I created) and also the 12x12 papers everywhere I go. I have had customers ask me about a certain set and since I have it in hand, I can show it to them on the spot. I have made additional sales of stamp sets by doing this!

Packaging:
I created my {ippity} shopping bags (similar to what others have shown) and I include the following items:

--the customer's order, which has one of my personal labels on each stamp set and/or package,
--a 'thank you' card for their purchase,
--a 'frequent buyer' card...for every $75 purchased, they get $5 off or a free ink pad that I have in stock (I keep track of the actual sales dollars),
--a little goodie bag (sample papers, buttons, {whatever I have on hand},
--a flyer that has each {ippity} collection pictured (8.5x11 paper which has two collections on one side),
--a flyer that has the basic info if they would like to sell {ippity} with my name as referral
.

Thanks, Jen, for sharing with all of us what you are doing. I'm sure many will find this info useful in their own business. Stop by Jenny's blog and give her a shout out.

I hope you all are having a fabulous day and for any of you heading out to CHA, I wish you safe travels and lots of fun! Wish I was there! Hugs, Lisa

Lisa Henke

Tuesday, July 6, 2010

Hi everyone... I have a simple tip for you today.

I love the idea of reusing cards.  Meaning, when I give a card to someone, he or she can turn around and use it for someone else.  But how to do that????  I used to use cute sticky notes for my messages.  Once removed, it is a clean and ready to use card again.  While I liked the sticky note idea, I wanted something a little fancier.  Which let to this bright idea.  Probably not original, but it sure made me happy and it is super easy.


This is my Hippity Hop card from yesterday.  Now, how to turn it into a reuseable card??? 

Just make an insert.  Super easy, right!?!


 I used some fancy resume paper I had in my closet and cut the insert just a tad smaller than the card.  Decorate as you would normally for the inside of the card and insert.  That way the recipient can remove and reuse the card should they want too.  Fun right!  I also keep some simple inserts on hand (for birthdays and such) so I can grab any card and insert when I need it. 


Now I have options for this card.  It could be for a baby gift or for Valentine's Day depending on which comes first!!!  heehee. 


I hope you enjoyed my tip, not exactly rocket science, but it is a tip I love to use.

Lisa Arana

Tuesday, June 29, 2010

Clearly A Good Idea

I have a clearly simple T{ippity} Tuesday tip!I LOVE sewing on my projects but when I started crafting I have to say it was a bit of a pain. Changing thread colors wasn't really easy and I had about a dozen different bobbins threaded with all the different colors I had. I usually ended up just stitching with black because it was too much work to rethread the whole machine just to use pink on one project.
BUT this tip changed it all!!
CLEAR THREAD

Simple, right?!?! You only need ONE bobbin with clear thread...then you can change to any color you want simply by changing the spool on your machine. The clear thread only shows up on the bottom of your project and you can use any color you want...really quick...really easy :)
Now I sew on LOTS of my projects....here are a few to get your wheels turning.
HAPPY SEWING!!!!

If you can forgive the person you were, accept the person you are, and believe in the person you will become, you are headed for joy. So celebrate your life!

Maria Gurnsey

Tuesday, June 15, 2010

Tippity Tuesday!!

Hi there! It's me Karen with a T{ippity} Tip for you
this T{ippity} Tuesday!
It's a really quick and simple one, but yet,
I just love it and wanted to share it with you today...

It's all about the push pins!!

So, my tip for you today, is to take a look at your ippity stamp sets
and make some fun"push pins" to use on cork board!!

I made this quick cork board black frame, and decided to go through my "Now & Always" stamp set and use a couple of those gorgeous flowers to make some beautiful "push pins" with some leftover Prima designer papers..it's a great way to use up those scraps!!

Next, I decided to add a couple of these fabulous ippity quotes from my "Delightful Little Things" and "Love in Return" stamp sets! I'm always impressed at how the designers keep coming up with such fantastic quotes!! Love-em!!

Took it a step further, and I decide to decorate this cork board frame a little bit just to show you some extra examples of how you can even make the quotes part of your cork board decoration and/or make as "push pins" too! I just stamped and cut out some of these quotes that would go with my son's graduation photo (yep, he is graduating this week), and distress inked them up!! I love how the quotes can be sweet reminders as they sit on your cork board!!

That's about it!
Hope this inspires you to make some too!

Hope you have a wonderful day!!
**Karen**

Tuesday, May 25, 2010

Tuesday's Tip- Two Color Stamping!

Happy Tuesday to all my fabulous Ippity friends!!

This is Kelly here today and I had some queries this week about how I was able to stamp the sentiment you see below in two different colors.   You probably saw this card I made for last week's Hip Hop on my blog last Thursday so sorry for the repeat appearance. But it will serve the purpose in demonstrating the color process.  :-)


The sentiment I am using today is one of the fabulous sentiments from the new Ippity Spring Release set called Delightful Little Things.  There is certainly more than one way to get two or more colors of ink onto your sentiments and images.   (In fact Lisa H. uses her watercolor markers and the "huffing" technique,) but since I don't have any watercolor markers I use my Stamp-a-mjig and ink pads!

Here is a quick tip (actually a tutorial) on how I do it!


Gather your supplies.  My technique requires the stamp-a-majig and 
I like to use a Post-It-Note (you can use several for larger images!)


Start by stamping your image on the stamp-a-majig plastic piece.
{I thougth my card used brown and not black ink, so pretend I am using black!! LOL!)


Stamp the image onto the Post-It Note.


Carefully remove the words that you want to show up in your accent color.  
Try to cut it in such a way that your Post-It Note will remain intact.  Use tape if you have to.


Place your Post-It Note onto the surface you want to stamp.  
Carefully line up the stamp-a-majig over the image on the Post-It Note.  


 Using your accent color, stamp the image again over the Post-It Note.  
The color will only show up on your paper where the words have been removed.  
DO NOT remove the Post-It Note yet!


Apply temporary sticky to the back of the words you removed.  
Now replace them like puzzle pieces back into the holes on the Post-It Note.


Carefully remove the rest of the Post-It Note leaving only the words you just replaced.


Line your stamp-a-majig back up over the two words showing.  
And stamp your sentiment with the second color you want to use.


Remove your the remaining pieces of Post-It Note and Wala!!  You did it!!  :-)


Now all you have to do is have fun finishing your card!!


Are you interested in getting the quote stamp that I used today? 
Well you can get this whole quote kit called 
Delightful Little Things 
by contacting an Ippity Chick today.

Click HERE to find a Chick near you!!