Hello and welcome to another Hip Hop!!
I hope that you have been completely inspired by seeing all the DT members' blogs from both Unity and Ippity. If you missed starting at the beginning, please visit the Unity blog to start the Hop and then follow along to each of the DT members' blogs by clicking on the Next blog Icons on each blog!
This is Kelly here and I have a "That's How Thursday"
tutorial for you today on
Using Ippity stamps to Dry Emboss!
Did you see my card for today's Hop?
It uses dry embossing instead of stamping with ink.
And here is how I did it!
On a piece of cardstock, stamp an Ippity image that you would like to dry emboss. I have used the butterfly from the Now and Always set. The ink you see here is the black Hybrid ink sold by Ippity.
Using an exacto knife, cut away the inside parts of the image. Be sure to leave small pieces of card stock still attached between the different parts of the stamp.
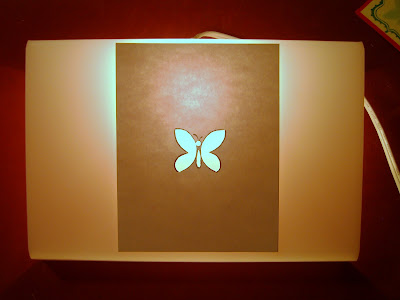
Here you can see all the parts cut away. Next I placed the cardstock template that I created onto a lightbox. If you don't have one, you can also place it up to a window and allow the sun to shine in from behind it.
Using the piece of paper that you want embossed, turn it over with the top side turned down and position it where you need it to be.
At this point for easier embossing, you can place a piece of waxed paper over your paper. Using a stylus, trace around the inner edges of the template. It will cause a depression in the shape of the stamp that when turned over will be embossed!
Here is a view of the embossed image. See how it is raised and takes the shape of the stamped image?
To help the embossed image have better dimension and be seen better you can consider using chalk or inks on the embossed edges. Here I have added chalking to the image.
And here is the completed card!
For more details on how I made my card, you can visit my blog post HERE!
To purchase any of the stamps used for the making of this tutorial, simply click on the Ipipty Chick Locator icon on the left hand side of the blog! Our very own Maria made the sketch you see here. If you would like to use it to, simply create your project and upload it to the SCS Gallery using the keywords, Unity and IHHC10.
Thanks so much for joining us on today's Hip Hop!
We appreciate you visiting our blogs and leaving comments for us!
Leave a comment here for a chance to win the Just Wanted to Say Ippity Stamp set!
The winner will be announced in a separate post on Friday morning!!
Good Luck!!
To start the Hip Hop blog hop at the beginning,
please visit the Unity Blog!


Really cute and creative, thanks for sharing that, I'll have to give it a shot!
ReplyDeletelove this tutorial, kelly, thanks so much:0
ReplyDeleteI love this technique - now I need to take my lightbox out of the box it;s been in for the past five years:-)
ReplyDeleteAmazing Ippity MOJO from all the DT! That's for this easy to follow tutorial. I just love this technique.
ReplyDeleteWonderful tutorial Kelly!!! I haven't had my light box out in years either. Thanks for the great inspiration!
ReplyDeletelisa a.
seriously???? wow! Kelly, you are soooo creative and always give us fabulous tutorials. this rocks!
ReplyDeleteThat sure opens the door to thinking about new shapes for cards!
ReplyDeleteAmazing technique.. love the you did this .. I am going to have to give it a try. Inspired by the creative crds today Girls!!
ReplyDeleteLove the tutorial. I've done this with punches but never thought of using stamps. Awesome!
ReplyDeleteI have a light box in my closet - still in the wrapper - you have inspired me to get it out and get crafty! Thanks for the tutorial!
ReplyDeleteOK, Kelly, this is just FABULOUS!!!! And now I know what I will use my lightbox for that has been staring at me in the garage I go to every time..hehehe..LOVE IT!!
ReplyDeleteWhat a great tutorial, Kelly!! I'd never thought to do dry embossing that way. I already have all of the tools--I can't wait to try it!!! Beautiful card you made, too :)
ReplyDeletedarling - thanks for the tutorial!
ReplyDeleteWow! What a fantastic tutorial Kelly! Thanks for the inspiration! I'm definitely going to give this a try!
ReplyDeleteWow. This will extend dry embossing power.
ReplyDeletehelps save some $$ from embossing floders and templates.
thanks kelly. this is cool
I have never tried dry embossing.....but I will now. Thanks.
ReplyDeleteA pretty card, and thanks for the tutorial. I don't know where my light box has gone to :-)
ReplyDeleteOoooo! Such a fabulous tip for us! Thanks for showing us how to do this! So simple and so fun!
ReplyDeleteSuper Hip Hop! Great tutorial!!!
ReplyDeleteThis is pure GENIUS!!! I would have never thought to try this :) LOVE IT!!!!
ReplyDeleteHow cool is that??!??!!? I learn something every time you guys do a tutorial...
ReplyDeleteOh wow Kelly this is such a great idea!!!!
ReplyDeleteWhat a fabulous tutorial! I never thought of using my stamps to make embossing templates--definitely on my "To Do" list now! :-) Happy weekend!
ReplyDeletewow... what a neat way to use your fave stamps even more.
ReplyDeleteOMGoodness--Kelly, you are TOOOOOOOOOOOOOOO CRAFTY! I love it! I love how clever you are:) Thanks for sharing! Love love love it:)
ReplyDeleteAdorable card....very fun technique!!
ReplyDeleteokay thought I had left a comment on this..but after searching twice I dont see it..I get distracted very easily these days.. any who love love love this idea..need to get me this set + a light box.
ReplyDeleteA great 'how to' Kelly!! Fabulous!!
ReplyDeletegreat tutorial! I need to be back into the swing of all things {ippity}. Being away for 5 days over the holiday weekend disrupted my creative flow!
ReplyDeleteWow Kelly...awesome work! I haven't done this is a looong time, so you've inspired me to 'get er done! *smile*
ReplyDeleteThank you Kelly! How fun this will be!!
ReplyDeleteThank you for taking the time to do this tutorial I can't wait to try this.
Have a Blessed week!