Happy Hip Hop!!!!
Are you ready for another fun Hop?? Well, get ready, as the Unity and the Ippity DT is bringing you another amazing hop today with full of eye candy! But before you hop along, I have a fun little tutorial for you. Remember my little bird house???
So, how would you like to make one of these????? Well, here is what you need to make it:
Silhouette bird house cutting file (yes, you will need a Silhouette cutting machine for it.
Cardstock: Georgia Pacific
Patterned Paper: Pink Paislee
Stamps:
Sweet Thoughts of Spring
What Matters Most
Fishy Philosophy
Ink: Memento, Ranger Distress, Powderpuff
Copic Markers
Scor-it
Helmar Craft Glue
So, first you need to cut out your little bird house template and here is what it will look like. I also scored all the lines, event hough they were already perforated by my Silhouette machine.
Than I scored my roof piece, which I cut out of plain white cardstock, as I was going to cover it with the scallops anyway.
In the next step I built my little bird house and glued it together everywhere except on the bottom, just in case I want to put something inside. For this I used Helmar's Craft Glue.
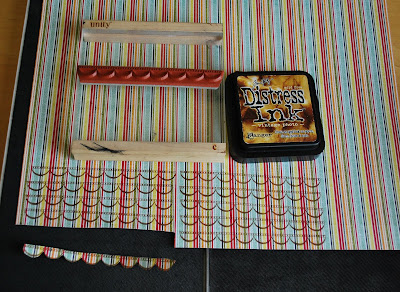
Next I stamped my scallops on the Pink Paislee patterned paper using Ranger Distress ink and cut them out individually. In all fairness after looking at my finished project, you can really just keep stamping on top of each other and just cut out one big roof, instead of the individual scallops..but, I had to do it the hard way...LOL
Next I glued all the scallops on top of my roof piece. And again, I used Helmar's Craft Glue, because it is the best quick drying liquid glue out there.
Next I inked up all the edges of my little house using Ranger Distress inks.
Finally I just had to assemble the house and the roof again with my Helmar Craft glue. And this is what my finished little bird house looked like before adding all the decorations. Cute, huh???
After this, I just added all the stamping. For this tutorial, I wanted to focus on the little house building with the scallop roof top, so I don't have photos of the rest, as that was just stamping and cutting out, but here is what the final product looked like.
And that is it.....hope you like this little tutorial. I love making cards, but once in a while it's good to play with something other than a card. In fact today I am going to make a layout using Ippity stamps...as Ippity is sponsoring the VSBN this weekend on Splitcoaststampers, so if you would like some fun scrapbooking challenges, make sure you stop in to have some fun!
Also please leave a comment below to win the Ippity stamp set
Because of you
And please make sure to come back tomorrow to check out if you won!!! You never know!! :)
Now hop on over to the Unity blog if you haven't done the Hip Hop blog hop yet!
Every day do something that will inch you closer to a better tomorrow.
Doug Firebaugh
Doug Firebaugh
Have a FABULOUS day!


I love this project! Thanks so much for the tutorial!
ReplyDeleteThanks for the tutorial - it's great to see just how you created that fabulous bird house.
ReplyDeleteI'm going to look for this birdhouse in the on-line Silhouette store.
ReplyDeleteYou created a fabulous birdhouse. Thanks for the tutorial.
Eveline.
Thanks for sharing...I love your bird house!
ReplyDeleteI just love this bird house! Thanks for a fabulous tutorial on how you make one. Love all the stamps you used too! Thanks for a chance at this sweet giveaway.
ReplyDeletethis is a work of love! just gorgeous, thanks for sharing it with us!
ReplyDeleteWhat an amazing project! It's beautiful! Thanks for the tutorial as well!
ReplyDeleteThis birdhouse is adorable! Love the step by step on how you did it. Now I want to make one :)
ReplyDeleteThis birdhouse is absolutely stunning and adorable!!! Thank you so much for posting the step-by-step tutorial Eva!!! I'm finished the hop so I'm off to look for the birdhouse template at the Silhouette store! Thanks for the inspiration!
ReplyDeleteI love birdhouses and this one is Adorable!
ReplyDeleteAwesome project - wish I had that Silhouette:-) Great job, Eva!!!
ReplyDeleteAMAZING tutorial Eva! Wow, yeah, definitely bowing down and saying "I'm not worthy, I'm not worthy"...lol...
ReplyDeleteAWESOME project, Eva! TFS! :)
ReplyDeleteWhat an adorable bird house ~ too cute!!
ReplyDeleteBeautiful! too cute for words x
ReplyDeleteAbsolutely fabulous! Thanks for sharing.
ReplyDeleteFABULOUS tutorial Eva :)
ReplyDeleteYour instructions are great. This is such a cute project!!
ReplyDeleteSeriously this is such a amazing project thanks for sharing with us how this beauty came together!!!
ReplyDeleteI might have a go...need to find a birdhouse template as i dont have a shiloette thingy machine :)
ReplyDeleteWonderful tutorial and birdhouse!!
ReplyDeleteI love the birdhouse. Thanks for a great tutorial!!
ReplyDeletelove the bird house so totally cute no machine here to cut that out but i love it anyway. thanks for the chance to win some ippity.
ReplyDeletewhat a super project thanks for the step by step details
ReplyDeleteThis is ingenious.I love the way you used the stamps on this and it's just to stinking cute.
ReplyDeleteThis is a great tutorial...thanks so much for posting it. You did an amazing job making my Silhouette birdhouse die come to life. I can't wait to link people back here to see how they can make it.
ReplyDeleteThis is gorgeous!! I will have to give one of these a go soon!
ReplyDeleteThank you for the great tutorial! I don't have one of those machines (yet! hehe),but you have inspired me to try and do this another way!
ReplyDeleteThank you for all the work that went into your beautiful bird house!
Have a Fantastic weekend Eva!
I love this little birdhouse!! Inspires me to make one today! Thank you!!!!!
ReplyDeleteSuper tutorial Eva!! I would have never guessed how you made that scallop rooftop! Love it, and just adore your little birdie house!
ReplyDeleteI'm a big fan of Samantha Walker. Love what you did with the bird house. And thanks for the glue tip, I've been wanting a better glue.
ReplyDeleteBeautiful ...
ReplyDeleteI may have to design something like this with my gypsy :)
BEAUTIFUL project! I might have to see if I can do something similar with my cricut... don't have a silouette yet.
ReplyDeleteGorgeous - and what a fabulous tutorial!!
ReplyDeleteGorgeous!!!! And it makes me happy that I own a Silhouette!!!!
ReplyDeleteOhhh Adorable! I need to do some research to find out MORE about these kits! THANKS!
ReplyDeleteThis is just gorgeous Eva! Thank you for the tutorial, as I just bought this cutting file a few days ago! Now I will have a good idea on how to put this together and embellish it.
ReplyDeleteGreat tutorial, wish I had a Silhouette....
ReplyDeleteWonderful tutorial . . . might have to try it since I have a Silhouette!!!
ReplyDeleteSuch a sweet project - very cute!! Thanks for the great tutorial :)
ReplyDeleteThanks for the tutorial. And for the blog hop. I got lots of inspiration along the way.
ReplyDeleteCan we have the dimensions to the birdhouse or away of downloading the template for those of us that don't have a silhouette. I love the birdhouse and would love to try it. Thanks
ReplyDeleteOh I love this adorable birdhouse!!!! It is so cute...thanks for your tutorial!
ReplyDeletedang, that is just the cutest little bird house...love, love, love it.
ReplyDeletecolleen martineau
glyndi4don@sbcglobal.net
This is so super cute!!!! Awesome project!!!
ReplyDelete