Welcome to another addition of {Ippity}'s
That's How [you do it] Thursday!!
I have a great tutorial to share with you of something that I created while making Christmas cards this year. I am going to teach a really cool technique to make dimensional snow for your cards and layouts! But before I get started I wanted to make sure that you saw what Michelle posted on the blog yesterday about the incentives for both sales and referrals. After you finish reading, keep scrolling down and see what {ippity} is offering if you get referrals and meet certain sales marks!! They are really awesome!!
You may remember me posting this card for our first H{ippity} Hop blog hop two Monday's ago. The challenge was to make snow. I mentioned in my post that I had found a neat way to create the look of dimensional snow without adding too much weight or bulk to your cards. So today I am going to show you how I did it!
Here are some closeups of the snow...
Are you ready to learn how?
To get started making this snow, you need to gather the following supplies...
White tissue paper
White cardstock
Mod Podge
Foam brush
White/Silver Glitter
and additionally,
Paper cutter
scissors
Sewing machine (optional)
Step 1:
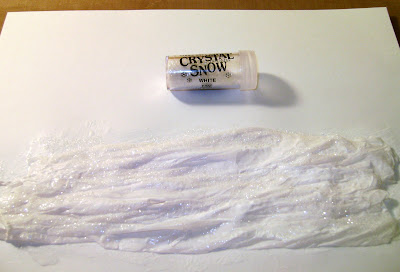
Layout a single piece of wrapping tissue paper out on your piece of Cardstock that is many times taller than the final size you will need and slightly wider.. Using your fingers squish the tissue paper together causing it to bunch upon itself horizontally as shown in the picture above. Set this aside.
Step 2:
Apply Mod Podge onto your carstock using a foam brush. Cover an area that will be a bit larger than the finished size you will need for your project.
Step 3:
Place your scrunched up piece of tissue paper onto the area of the cardstock where you just applied the Mod Podge. Then apply Mod Podge to the surface of the tissue paper too. Be gentle with this process as the tissue paper tears easily.
Step 4:
While the Mod Podge is still drying, apply glitter over the surface and allow the piece to dry completely before proceeding to the next step.
Step 5:
Trim the dried piece of tissue paper to the size that you want for your project using a paper trimmer.
Step 6:
Shape your piece of snow to the desired shape. You might consider making rolling hills or snow banks.
Step 7:
Adhere the cut portion of the snow to the card base and add machine stitching (if desired) to the top of the snow to accent the look of snow drifts and layers of snow.
Step 8
Next, all you have to do is omplete your card as desired!!
Here is the one that I created while preparing this tutorial. the {ippity} stamps used in this card come from the Kissmas & Mistletoe kit.
And here is a closeup of the snow...
I hope you like this technique as much as I have liked the way it looks on my cards! If you get a chance to try it, I sure would love to see what you made in the {ippity} Gallery. Have fun with it! :-)


Absolutely gorgeous! Thanks for the how-to!!
ReplyDeleteBeautiful Kelly! I can't wait to try this technique!
ReplyDeleteKelly, you are soooo clever! Thanks for the instruction...your card is absolutely beautiful!
ReplyDeletewhat great tips! will have to try
ReplyDeleteLove the classic monochromatic look of this card, beautiful!
ReplyDeleteWOW Kelly!! Great tutorial :)
ReplyDeleteKelly, you are just so darn crafty! LOVE this!
ReplyDeleteI love this technique, it looks so good!! Thanks for doing the tutorial!!
ReplyDeletelook at you, you crafty girl!!!! love this, so cool and looks fabulous!
ReplyDeleteLOVE this! Very clever, Kelly! :)
ReplyDeleteCool and why not use blue for skies, green for grass, etc.....what fun!
ReplyDeleteOMG!!!! I totally missed out on this....holly molly, I love this tutorial!!!! Awesome, girlie!!!!
ReplyDeleteWOW!!! This looks amazing, what real looking snow!!! THANKS!!!
ReplyDeleteWhat a great tutorial (I am printing it off for next year!)Thanks so much - your cards are gorgeous and that tree stamp is a must have.
ReplyDeleteMerry Christmas.
HW
xx